about photographing
about photo sharpening
Wanting to sharpen photos before submitting them to the Internet is evident. The photos taken simple camera have auto sharpening and we see them always sharpened but digital SLR camera give view natural, which appear us on the screen not delightfully. If we want to resize photo to more small size then ought to more sharpen it.There are many techniques of sharpening but result not always is satisfactory. I've found method of sharpening in the Internet that please me very much. I use to it program Photoshop according following steps.
Step 1: convert from RGB color to Lab color mode
Step 2: select lightness channel
Step 3: filter Unsharp Mask:amount about 130%,Radius 1px, Treshold 0;
Step 4: convert back to RGB color mode
If result is satisfactory then process of sharpening is over.
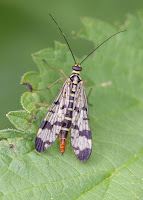
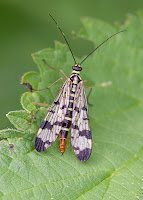
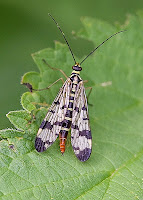
First photo without sharpening, second photo after process of sharpening and third photo after next sharpening process with visible noise at left top corner.
about composition in photography
The composition in photography is similar to composition in the painting. This one have underline the beauty, extraordinariness and other important features. The goal of composition is to create an image, that will be attractive for you and for lookers which look at this photo. First there need to draw near attention of looker, secondly - keep attention and prompt to look out your other photos. Not significant there is what subject need to proceed to realization all these conditions. Besides photo ought to be technically high quality: correct exposition, suitable sharpness in essential points of photo. The photo ought to have foreground, middle and background.
You can hold the attention of an interesting story or turn. Try to simplify the picture to a necessary minimum, which reveals the meaning of the image leads the Viewer to the main idea of the frame. Photography should not embarrass or offend the senses. Try to make a harmonious, nice looking frame, near which-if, for example, hang on the wall-you would have been able to hold out long enough.
Is there such a thing called perspective. The idea is that of a different view. Therefore, any object details are visible or hidden. For example, Baba yaga with huge nose may have a very slender and beautiful neck. You can capture the photo. In short changing the perspective (i.e. the point of shooting), you can completely change the whole look, spirit and idea of the plot.
General tips
So I advise you to read all the hints-exactly to find something new for yourself.
• Do not assemble frame symmetrically, except a picture frame or rhythmic symmetry as the main ideas.
• Do not place the horizon or surface water in the middle of the frame-this tends to divide the frame into two independent parts, and confuses the spectator trying to determine what portion of a scene is more important. Frame could also fall apart if wood (posts), corner of building in the centre of the frame and, respectively, the changes of brightness and colour. Apart from the idea of frames.
• Ensure that the main object is not merged with the background image. Try to main object using the direction of sunlight (shade), the camera position, limiting the space or choosing from sharply contrasting background colour.
• Avoid large blank spaces, such as clear blue skies, the boring monotonous plain or surface water. Try to find anything of substance that fills the void, like hanging down branch or cloud.
• Build frame on a diagonal. Do not do this if the horizon or, for example, the building will look strange. Diagonal composition with the direction left-bottom to right top calmer than built on the opposite, more dynamic diagonals.
• Keep the horizontal position of the water and the floating ships. Slope of the pond surface cut eye.

 Quite often it happens that the photograph containing the water surface, this surface is not exactly horizontally laid and we often do not recognize. Using Photoshop or other image software can be easily improved. It is worth remembering for accurateness. Above photos from this example.
• Try not to tilt the structure. First, the camera exactly a keep. Secondly, if we remove a korotkofokusnym-28 mm lens,it is necessary to remember about the distortions and that if you tilt the camera up or down, the distortion is increased. For the taking photos of architecture there are special shift lenses.
• Framing story (frame). Use twigs, trees, etc. to create a framework and thus emphasizing the main subject. Use this technique just to fill an empty space in the sky dull or hide unwanted parts of an image. The frame can also help create a larger frame (in the form of some of the plans). Not to do major frame semantic element.
• Fill the frame with the content. Get as close as possible. Use the zoom. Make your object as much as possible. This allows the viewer to instantly highlight on the image without a long walk across the picture.
• Try to observe a balanced composition, so that the upper part of the photo does not look heavier than the bottom. The same applies to the parties.
• Shoot a close-up portrait at eye level. If you photograph a person standing, it is better to lower the camera on his chest or waist level. When you use this technique, your feet don't seem short when using normal (50 mm) or shortlens (28 mm).
• Do not be lazy to stoop down, taking pictures of children and animals. Take photo from their heads. Don't shoot straight from the bottom up or from the height of your growth down, unless you want to achieve a special effect. In any case, pay attention to the background. Keep your horizon line or other line background do not pass through the head.
• In the portrait photo is very important value, usually, have eyes. They must therefore have the greatest sharpness in the photo. If you hard to catch eyes, you can focus in on the top button closure collar, which in many cases coincides with the plane of the eye.
• Good to in the photo would be lines leading the viewer's eye to the object frame. These lines can be created by fence or alley. Don't make such a lead line too dominant, because the eye can get tired, so that never reach your main object. Leading lines shall be inclined upwards or downwards.
• When you photograph movement (running man) leave him room for movement, that is, place the object as if it just came over the photo, not leaving it. Composition will appear more dynamic, if the frame is constructed from right to left. Use a small depth of field (DOF) (if your camera allows you to adjust the setting) to isolate your subject from the environment.
• Do not distort individuals. The short lens at close range makes a huge nose, and small ears. Too long lens will make a face too flat. For shooting portraits of the most suitable distance 2 meter with lens about 100 mm (35 mm camera). In this case, the proportions are most properly. However, you can get interesting effects using short lens (about 20 mm.) But in this case it is necessary to move literally up close.
• Avoid bright lights or variegated color spots away from the main plot. It distracts the viewer.
• Photograph widely. For example, a view of the building, to consider its facade and its side, better than just the facade. Include in the story objects of foreground so as the branch of a tree, mailbox etc., even if they are not sharp.
• Family pictures can be improved by using the background that forms the border. Or a bit of imagination can help to seat the family on a bench in a garden. No need to line up all in a row.
• Dull plot can significantly enliven including in the frame human figure, for example,by comparison to others. If another person wears bright clothes or umbrella, this further embellishes the storyline. Nice looking appearance may not have expressed the interest in this case can put in the frame of your friend, looking at this beautiful place situated on a picnic or. Put the camera on a tripod and a timer to have a picture of myself.
• When you take pictures of people, trim body parts as horrible. Shoot all the shape or to mid thigh. Hand cut to the shoulders instead of hands. Do not place a person as a doll, and put it in three quarters of turnover or let leans on the tree. Add actions-let, say, sniffing a flower or even eats a delicious sandwich. Give the man a compact posture, to fill the frame. For example, sitting with preloaded with feet. Of course, if the person will feel comfortable in this position.
• More about pictures of people. Make sure that from the human head has not grown horns, trees and telegraph poles. If grow-depart a little aside. If you can change aperture-open it to drastically reduce the depth of the depicted space and thereby weaken the influence of background.
• Catch a beautiful sky. Faded white, clouded or clear blue skies not always look quite attractive. Often the scene looks much better with fluffy little clouds. Of course, this means the need to wait, or even come in different times to get a beautiful shot.
• Another tip-include an odd number of identical objects. I.e. one or three flowers look better than two or four. For special subjects this rule you can certainly break.
• Look for shade. Although to the naked eye shadows may appear light and transparent, on the photo they will look much heavier than you remember the scene. You can to soften shadows using fill flash.
Quite often it happens that the photograph containing the water surface, this surface is not exactly horizontally laid and we often do not recognize. Using Photoshop or other image software can be easily improved. It is worth remembering for accurateness. Above photos from this example.
• Try not to tilt the structure. First, the camera exactly a keep. Secondly, if we remove a korotkofokusnym-28 mm lens,it is necessary to remember about the distortions and that if you tilt the camera up or down, the distortion is increased. For the taking photos of architecture there are special shift lenses.
• Framing story (frame). Use twigs, trees, etc. to create a framework and thus emphasizing the main subject. Use this technique just to fill an empty space in the sky dull or hide unwanted parts of an image. The frame can also help create a larger frame (in the form of some of the plans). Not to do major frame semantic element.
• Fill the frame with the content. Get as close as possible. Use the zoom. Make your object as much as possible. This allows the viewer to instantly highlight on the image without a long walk across the picture.
• Try to observe a balanced composition, so that the upper part of the photo does not look heavier than the bottom. The same applies to the parties.
• Shoot a close-up portrait at eye level. If you photograph a person standing, it is better to lower the camera on his chest or waist level. When you use this technique, your feet don't seem short when using normal (50 mm) or shortlens (28 mm).
• Do not be lazy to stoop down, taking pictures of children and animals. Take photo from their heads. Don't shoot straight from the bottom up or from the height of your growth down, unless you want to achieve a special effect. In any case, pay attention to the background. Keep your horizon line or other line background do not pass through the head.
• In the portrait photo is very important value, usually, have eyes. They must therefore have the greatest sharpness in the photo. If you hard to catch eyes, you can focus in on the top button closure collar, which in many cases coincides with the plane of the eye.
• Good to in the photo would be lines leading the viewer's eye to the object frame. These lines can be created by fence or alley. Don't make such a lead line too dominant, because the eye can get tired, so that never reach your main object. Leading lines shall be inclined upwards or downwards.
• When you photograph movement (running man) leave him room for movement, that is, place the object as if it just came over the photo, not leaving it. Composition will appear more dynamic, if the frame is constructed from right to left. Use a small depth of field (DOF) (if your camera allows you to adjust the setting) to isolate your subject from the environment.
• Do not distort individuals. The short lens at close range makes a huge nose, and small ears. Too long lens will make a face too flat. For shooting portraits of the most suitable distance 2 meter with lens about 100 mm (35 mm camera). In this case, the proportions are most properly. However, you can get interesting effects using short lens (about 20 mm.) But in this case it is necessary to move literally up close.
• Avoid bright lights or variegated color spots away from the main plot. It distracts the viewer.
• Photograph widely. For example, a view of the building, to consider its facade and its side, better than just the facade. Include in the story objects of foreground so as the branch of a tree, mailbox etc., even if they are not sharp.
• Family pictures can be improved by using the background that forms the border. Or a bit of imagination can help to seat the family on a bench in a garden. No need to line up all in a row.
• Dull plot can significantly enliven including in the frame human figure, for example,by comparison to others. If another person wears bright clothes or umbrella, this further embellishes the storyline. Nice looking appearance may not have expressed the interest in this case can put in the frame of your friend, looking at this beautiful place situated on a picnic or. Put the camera on a tripod and a timer to have a picture of myself.
• When you take pictures of people, trim body parts as horrible. Shoot all the shape or to mid thigh. Hand cut to the shoulders instead of hands. Do not place a person as a doll, and put it in three quarters of turnover or let leans on the tree. Add actions-let, say, sniffing a flower or even eats a delicious sandwich. Give the man a compact posture, to fill the frame. For example, sitting with preloaded with feet. Of course, if the person will feel comfortable in this position.
• More about pictures of people. Make sure that from the human head has not grown horns, trees and telegraph poles. If grow-depart a little aside. If you can change aperture-open it to drastically reduce the depth of the depicted space and thereby weaken the influence of background.
• Catch a beautiful sky. Faded white, clouded or clear blue skies not always look quite attractive. Often the scene looks much better with fluffy little clouds. Of course, this means the need to wait, or even come in different times to get a beautiful shot.
• Another tip-include an odd number of identical objects. I.e. one or three flowers look better than two or four. For special subjects this rule you can certainly break.
• Look for shade. Although to the naked eye shadows may appear light and transparent, on the photo they will look much heavier than you remember the scene. You can to soften shadows using fill flash.
how to remove artifacts
Artifacts are the little bits of digital noise that you can spot in magnified digital images in areas of shadow or large areas of even colours (a big blue sky for example). Below there are two photos. First photo have visible in magnification artefacts and second photo is after get rid artefacts. If we reduce them with the reduce noise filter in the Photoshop not only remove the noise, but also reduce details. There are many programs for reduce noise better or worse but all ones have this defect. How there can avoid of it I found on site of Dave'a - American photographer . There is link to this site Photos4u2c . I must admit that isn't too easy used his method but effect was admirable. Now I use his way very often even when artefacts aren't too visible.

 You can see result when you peer at left side especially at left bottom corner. It will be more visible when you will copy photos and peer in your browser in magnification.
optical vignetting

Above photo of Сергей Евдокимов from Russia. We see all the corners of this photo are greyed a little. It's example of optical vignetting. This defect can be due to the lens limitations or by camera settings. The camera settings refer to the lens aperture and can often be cured by a reduction in aperture of 2–3 stops.


 Quite often it happens that the photograph containing the water surface, this surface is not exactly horizontally laid and we often do not recognize. Using Photoshop or other image software can be easily improved. It is worth remembering for accurateness. Above photos from this example.
• Try not to tilt the structure. First, the camera exactly a keep. Secondly, if we remove a korotkofokusnym-28 mm lens,it is necessary to remember about the distortions and that if you tilt the camera up or down, the distortion is increased. For the taking photos of architecture there are special shift lenses.
• Framing story (frame). Use twigs, trees, etc. to create a framework and thus emphasizing the main subject. Use this technique just to fill an empty space in the sky dull or hide unwanted parts of an image. The frame can also help create a larger frame (in the form of some of the plans). Not to do major frame semantic element.
• Fill the frame with the content. Get as close as possible. Use the zoom. Make your object as much as possible. This allows the viewer to instantly highlight on the image without a long walk across the picture.
• Try to observe a balanced composition, so that the upper part of the photo does not look heavier than the bottom. The same applies to the parties.
• Shoot a close-up portrait at eye level. If you photograph a person standing, it is better to lower the camera on his chest or waist level. When you use this technique, your feet don't seem short when using normal (50 mm) or shortlens (28 mm).
• Do not be lazy to stoop down, taking pictures of children and animals. Take photo from their heads. Don't shoot straight from the bottom up or from the height of your growth down, unless you want to achieve a special effect. In any case, pay attention to the background. Keep your horizon line or other line background do not pass through the head.
• In the portrait photo is very important value, usually, have eyes. They must therefore have the greatest sharpness in the photo. If you hard to catch eyes, you can focus in on the top button closure collar, which in many cases coincides with the plane of the eye.
• Good to in the photo would be lines leading the viewer's eye to the object frame. These lines can be created by fence or alley. Don't make such a lead line too dominant, because the eye can get tired, so that never reach your main object. Leading lines shall be inclined upwards or downwards.
• When you photograph movement (running man) leave him room for movement, that is, place the object as if it just came over the photo, not leaving it. Composition will appear more dynamic, if the frame is constructed from right to left. Use a small depth of field (DOF) (if your camera allows you to adjust the setting) to isolate your subject from the environment.
• Do not distort individuals. The short lens at close range makes a huge nose, and small ears. Too long lens will make a face too flat. For shooting portraits of the most suitable distance 2 meter with lens about 100 mm (35 mm camera). In this case, the proportions are most properly. However, you can get interesting effects using short lens (about 20 mm.) But in this case it is necessary to move literally up close.
• Avoid bright lights or variegated color spots away from the main plot. It distracts the viewer.
• Photograph widely. For example, a view of the building, to consider its facade and its side, better than just the facade. Include in the story objects of foreground so as the branch of a tree, mailbox etc., even if they are not sharp.
• Family pictures can be improved by using the background that forms the border. Or a bit of imagination can help to seat the family on a bench in a garden. No need to line up all in a row.
• Dull plot can significantly enliven including in the frame human figure, for example,by comparison to others. If another person wears bright clothes or umbrella, this further embellishes the storyline. Nice looking appearance may not have expressed the interest in this case can put in the frame of your friend, looking at this beautiful place situated on a picnic or. Put the camera on a tripod and a timer to have a picture of myself.
• When you take pictures of people, trim body parts as horrible. Shoot all the shape or to mid thigh. Hand cut to the shoulders instead of hands. Do not place a person as a doll, and put it in three quarters of turnover or let leans on the tree. Add actions-let, say, sniffing a flower or even eats a delicious sandwich. Give the man a compact posture, to fill the frame. For example, sitting with preloaded with feet. Of course, if the person will feel comfortable in this position.
• More about pictures of people. Make sure that from the human head has not grown horns, trees and telegraph poles. If grow-depart a little aside. If you can change aperture-open it to drastically reduce the depth of the depicted space and thereby weaken the influence of background.
• Catch a beautiful sky. Faded white, clouded or clear blue skies not always look quite attractive. Often the scene looks much better with fluffy little clouds. Of course, this means the need to wait, or even come in different times to get a beautiful shot.
• Another tip-include an odd number of identical objects. I.e. one or three flowers look better than two or four. For special subjects this rule you can certainly break.
• Look for shade. Although to the naked eye shadows may appear light and transparent, on the photo they will look much heavier than you remember the scene. You can to soften shadows using fill flash.
Quite often it happens that the photograph containing the water surface, this surface is not exactly horizontally laid and we often do not recognize. Using Photoshop or other image software can be easily improved. It is worth remembering for accurateness. Above photos from this example.
• Try not to tilt the structure. First, the camera exactly a keep. Secondly, if we remove a korotkofokusnym-28 mm lens,it is necessary to remember about the distortions and that if you tilt the camera up or down, the distortion is increased. For the taking photos of architecture there are special shift lenses.
• Framing story (frame). Use twigs, trees, etc. to create a framework and thus emphasizing the main subject. Use this technique just to fill an empty space in the sky dull or hide unwanted parts of an image. The frame can also help create a larger frame (in the form of some of the plans). Not to do major frame semantic element.
• Fill the frame with the content. Get as close as possible. Use the zoom. Make your object as much as possible. This allows the viewer to instantly highlight on the image without a long walk across the picture.
• Try to observe a balanced composition, so that the upper part of the photo does not look heavier than the bottom. The same applies to the parties.
• Shoot a close-up portrait at eye level. If you photograph a person standing, it is better to lower the camera on his chest or waist level. When you use this technique, your feet don't seem short when using normal (50 mm) or shortlens (28 mm).
• Do not be lazy to stoop down, taking pictures of children and animals. Take photo from their heads. Don't shoot straight from the bottom up or from the height of your growth down, unless you want to achieve a special effect. In any case, pay attention to the background. Keep your horizon line or other line background do not pass through the head.
• In the portrait photo is very important value, usually, have eyes. They must therefore have the greatest sharpness in the photo. If you hard to catch eyes, you can focus in on the top button closure collar, which in many cases coincides with the plane of the eye.
• Good to in the photo would be lines leading the viewer's eye to the object frame. These lines can be created by fence or alley. Don't make such a lead line too dominant, because the eye can get tired, so that never reach your main object. Leading lines shall be inclined upwards or downwards.
• When you photograph movement (running man) leave him room for movement, that is, place the object as if it just came over the photo, not leaving it. Composition will appear more dynamic, if the frame is constructed from right to left. Use a small depth of field (DOF) (if your camera allows you to adjust the setting) to isolate your subject from the environment.
• Do not distort individuals. The short lens at close range makes a huge nose, and small ears. Too long lens will make a face too flat. For shooting portraits of the most suitable distance 2 meter with lens about 100 mm (35 mm camera). In this case, the proportions are most properly. However, you can get interesting effects using short lens (about 20 mm.) But in this case it is necessary to move literally up close.
• Avoid bright lights or variegated color spots away from the main plot. It distracts the viewer.
• Photograph widely. For example, a view of the building, to consider its facade and its side, better than just the facade. Include in the story objects of foreground so as the branch of a tree, mailbox etc., even if they are not sharp.
• Family pictures can be improved by using the background that forms the border. Or a bit of imagination can help to seat the family on a bench in a garden. No need to line up all in a row.
• Dull plot can significantly enliven including in the frame human figure, for example,by comparison to others. If another person wears bright clothes or umbrella, this further embellishes the storyline. Nice looking appearance may not have expressed the interest in this case can put in the frame of your friend, looking at this beautiful place situated on a picnic or. Put the camera on a tripod and a timer to have a picture of myself.
• When you take pictures of people, trim body parts as horrible. Shoot all the shape or to mid thigh. Hand cut to the shoulders instead of hands. Do not place a person as a doll, and put it in three quarters of turnover or let leans on the tree. Add actions-let, say, sniffing a flower or even eats a delicious sandwich. Give the man a compact posture, to fill the frame. For example, sitting with preloaded with feet. Of course, if the person will feel comfortable in this position.
• More about pictures of people. Make sure that from the human head has not grown horns, trees and telegraph poles. If grow-depart a little aside. If you can change aperture-open it to drastically reduce the depth of the depicted space and thereby weaken the influence of background.
• Catch a beautiful sky. Faded white, clouded or clear blue skies not always look quite attractive. Often the scene looks much better with fluffy little clouds. Of course, this means the need to wait, or even come in different times to get a beautiful shot.
• Another tip-include an odd number of identical objects. I.e. one or three flowers look better than two or four. For special subjects this rule you can certainly break.
• Look for shade. Although to the naked eye shadows may appear light and transparent, on the photo they will look much heavier than you remember the scene. You can to soften shadows using fill flash.


No comments:
Post a Comment